Amazon Echo and EV3 pt 2 - The Amazon Components
This is part 2 of a 3 part series on controlling a LEGO Mindstorms EV3 using an Amazon Echo. Part 1 is available here.
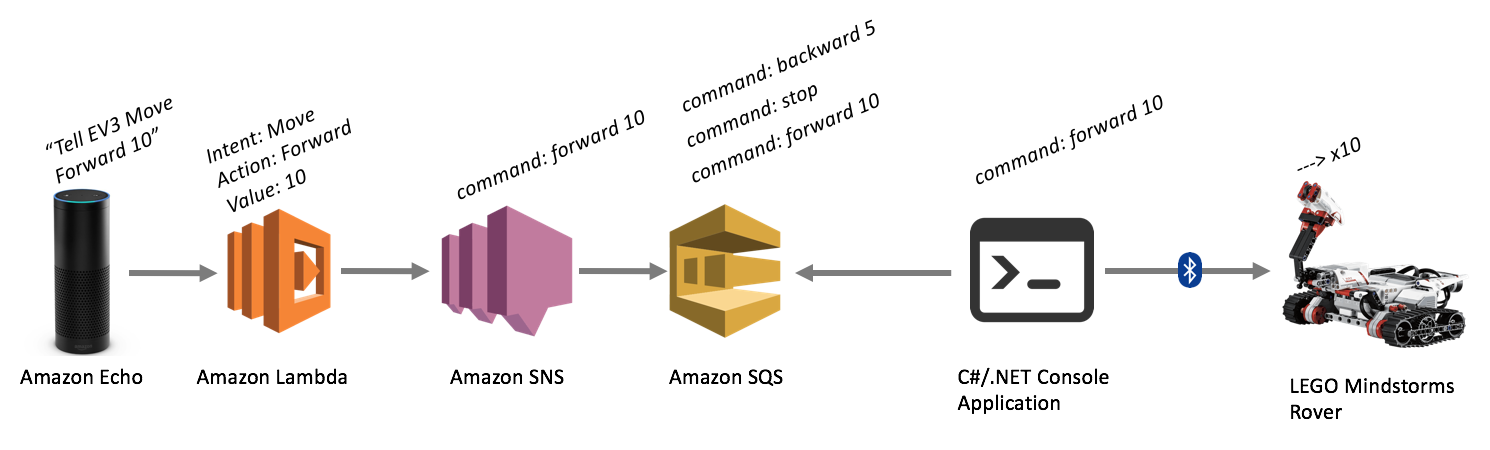
In the last article, I outlined the overall architecture of the Amazon Echo to EV3 interface. As noted in the high-level diagram below, a large percentage of the architecture resides in Amazon AWS components (Echo, Lambda, SNS, SQS). In this article, I'll show you how to wire up those pieces.
Although two-thirds of the architecture resides in AWS, there really isn't all that much work to do here. The Lambda function is by far the most complicated component on the Amazon side. But first, let's start with the pre-requisites.
Getting Started with Amazon AWS Development
The first thing you need to do is get yourself set up with an Amazon developers account and an AWS account. You should be able to use the same account for both, but make sure you familiarize yourself with both of these areas:
Once you've signed up and have browsed around the sites for a bit, you're ready to set up your first Amazon Echo / Alexa skill.
Creating an Alexa (Amazon Echo) "Skill"
The first thing you'll need to build is the Amazon Echo's "skill," which defines the way you interact with the device and how the interactions with it should be processed.
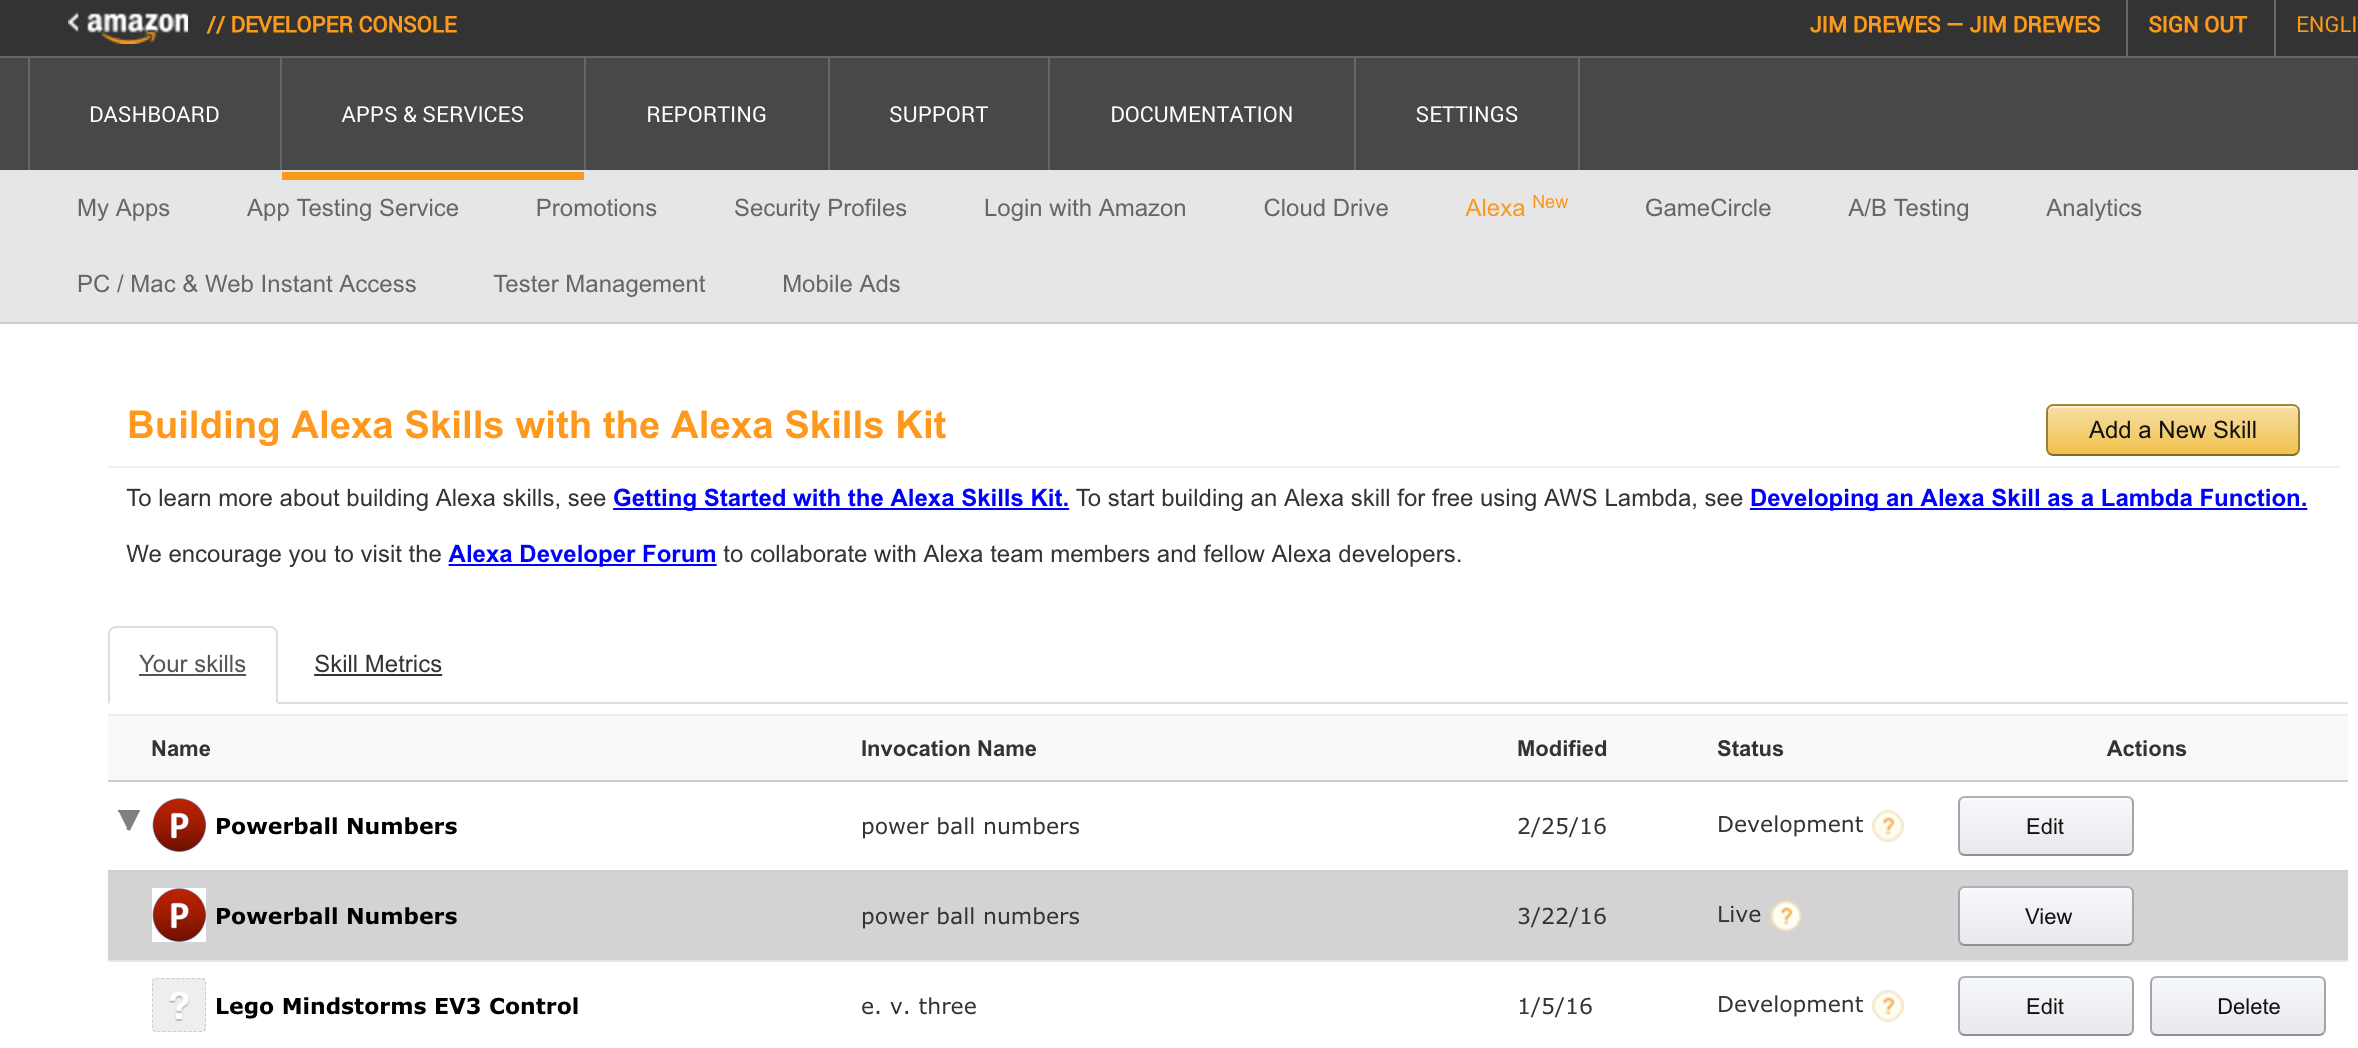
- Log into the Amazon Developer portal, and click on the "Apps and Services" tab at the top, followed by the "Alexa" sub-tab.
- You'll be presented with two options - the Alexa Skills Kit, and the Alexa Voice Service. You'll want to use the skills kit, which lets you add new skills to your Alexa. The voice service is for use in embedding voice recognition in other devices.
- You'll now be presented with a list of any skills you've already created, and a button to "Add a New Skill." Click that button.
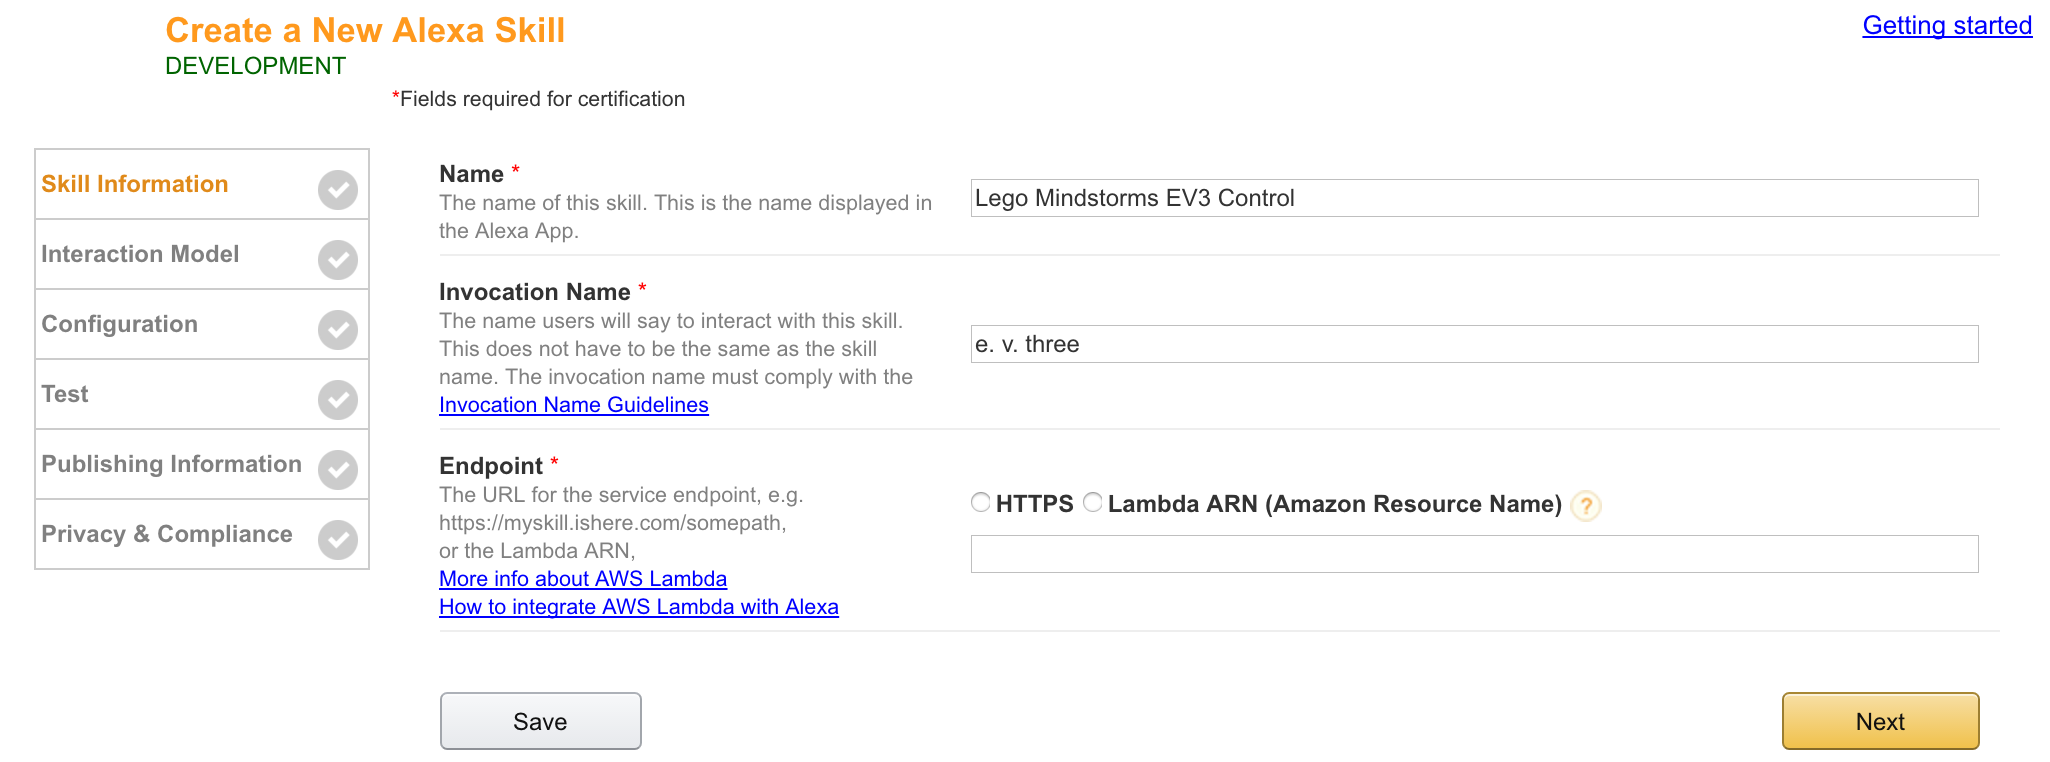
- Fill in the basic information about your new skill. The name can be anything you want. The invocation name needs to be the phonetically written out name you would like to verbalize when you address your Alexa. I would like to be able to say things like "Tell EV3 to move forward." But you can see in my example below, I couldn't just make my invocation name "EV3." Instead, I had to write "e. v. three."
- For now we are going to leave the Endpoint blank. You have two choices of endpoints - a web service URL, or an Amazon Lambda expression. Originally I had intended on using a web service, but I changed my mind fairly quickly. With Lambda expressions, all you need to do to wire it up is copy and paste the ARN, and make sure your expression has the right permissions. To use a web service, you'd have to write all the session and security handlers, plus you'd have to host the service. It just wasn't worth the effort.
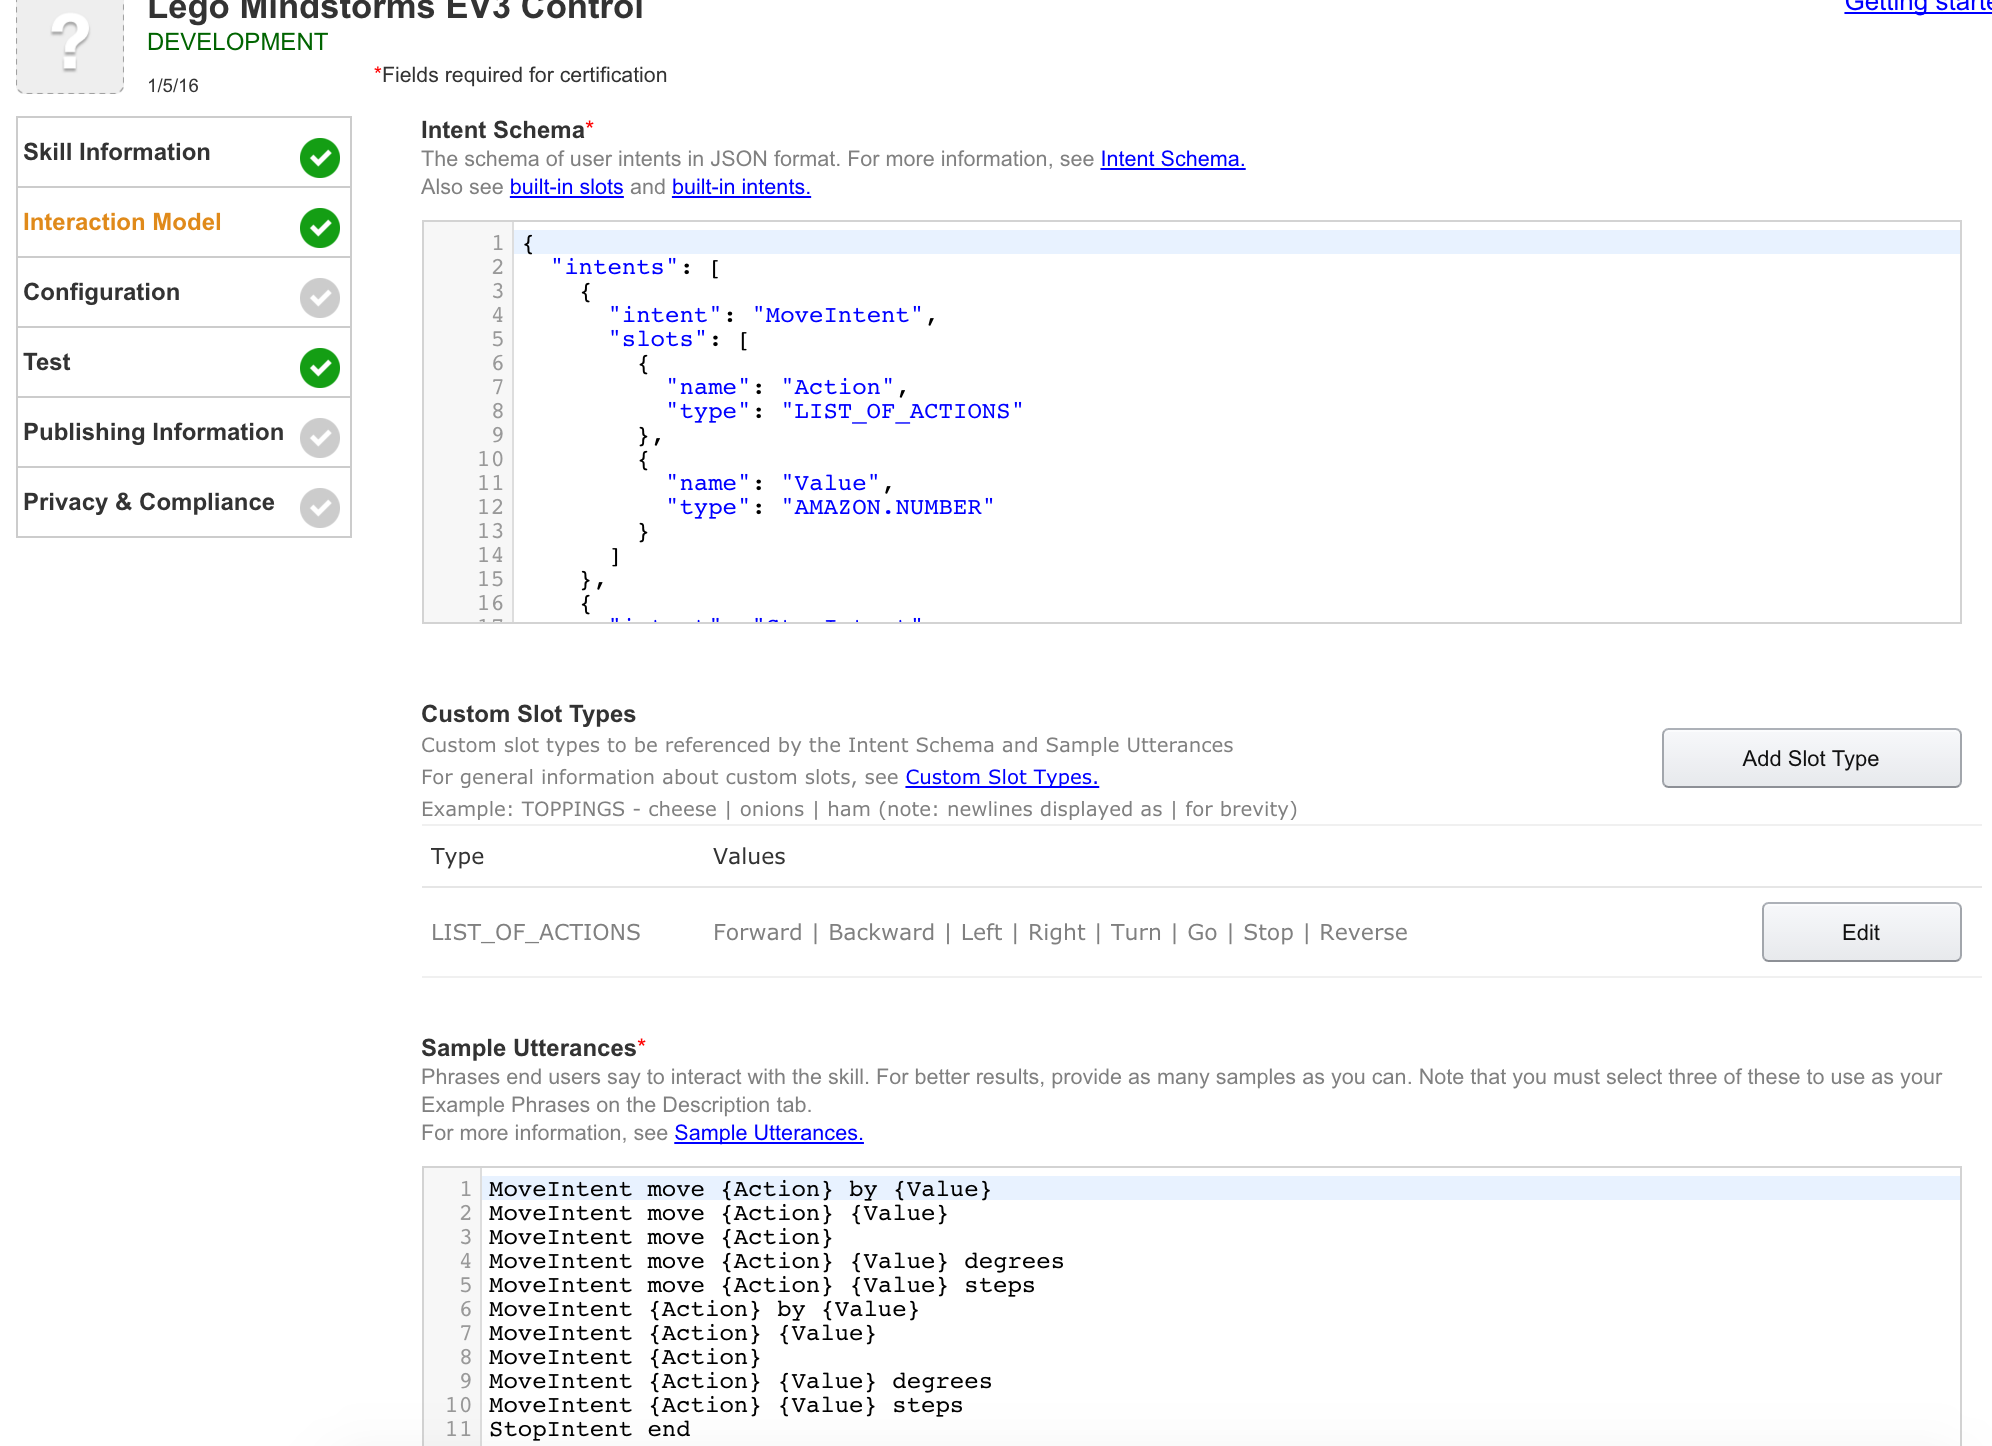
- The Interaction Model is where things start getting interesting. Here you will define the grammar for interacting with your Alexa skill. The important concepts to understand here are Intents, Slots, and Utterances.
Intents: An intent is action you'd like to perform or the interaction you'd like to have with the Alexa. You can think of these a lot like a method or function.
Slots: Slots are simply arguments to the intent / method / function. So if you had an intent called "AddNumbers", you might have slots for each of the numbers to add up.
Utterances: These are the actual phrases someone may vocalize to interact with your skill. Again, using the AddNumbers example, you may have an utterance like: "AddNumbers add {x} and {y} together."
For the EV3 application, I really only have two intents - "Move" and "Stop." When moving, the slots / variables are just an Action and a Value. The Action uses a custom slot type called `LIST_OF_ACTIONS`. This lets me pre-define the allowable values to go into that slot (like "Forward", "Left", and "Turn"). The value has a data type of any number. This way if I want to go forward a certain distance, I can capture the desired distance in the Value slot. See the github code for the exact intent schema, custom slot definition, and sample utterances that I used.
Once you've finished setting up your Alexa skill, the Test screen will become your new best friend. Here you can test the text-to-speech capabilities of Alexa. This is how you'll iron out the strange pronunciations Alexa comes up with that you didn't expect. More importantly, using the Service Simulator, you can check that your grammar and your lambda function interact with one another in the way you'd expect.
Creating Your Lambda Function
Now that you have your skill stubbed out, it's time to put in some backing code. Again, you could use a REST web service to handle requests from the Alexa, but there weren't any good skeleton services available out there when I wrote this initially. I didn't want to mess around with the AWS security model, among other things, so I opted for creating a Lambda function.
Lambda functions are simply hosted compute resources. You put your code into a Lambda function, and Amazon figures out the rest for you. Rather than hosting virtualized infrastructure, Lambda lets the developer just supply the logic to be hosted.
To create your lambda function, log in to your AWS account and go in to the Lambda function area. When you click to add a new function, you have the option of creating a function based on a pre-defined "blueprint." I'd recommend using one of the Alexa blueprints.
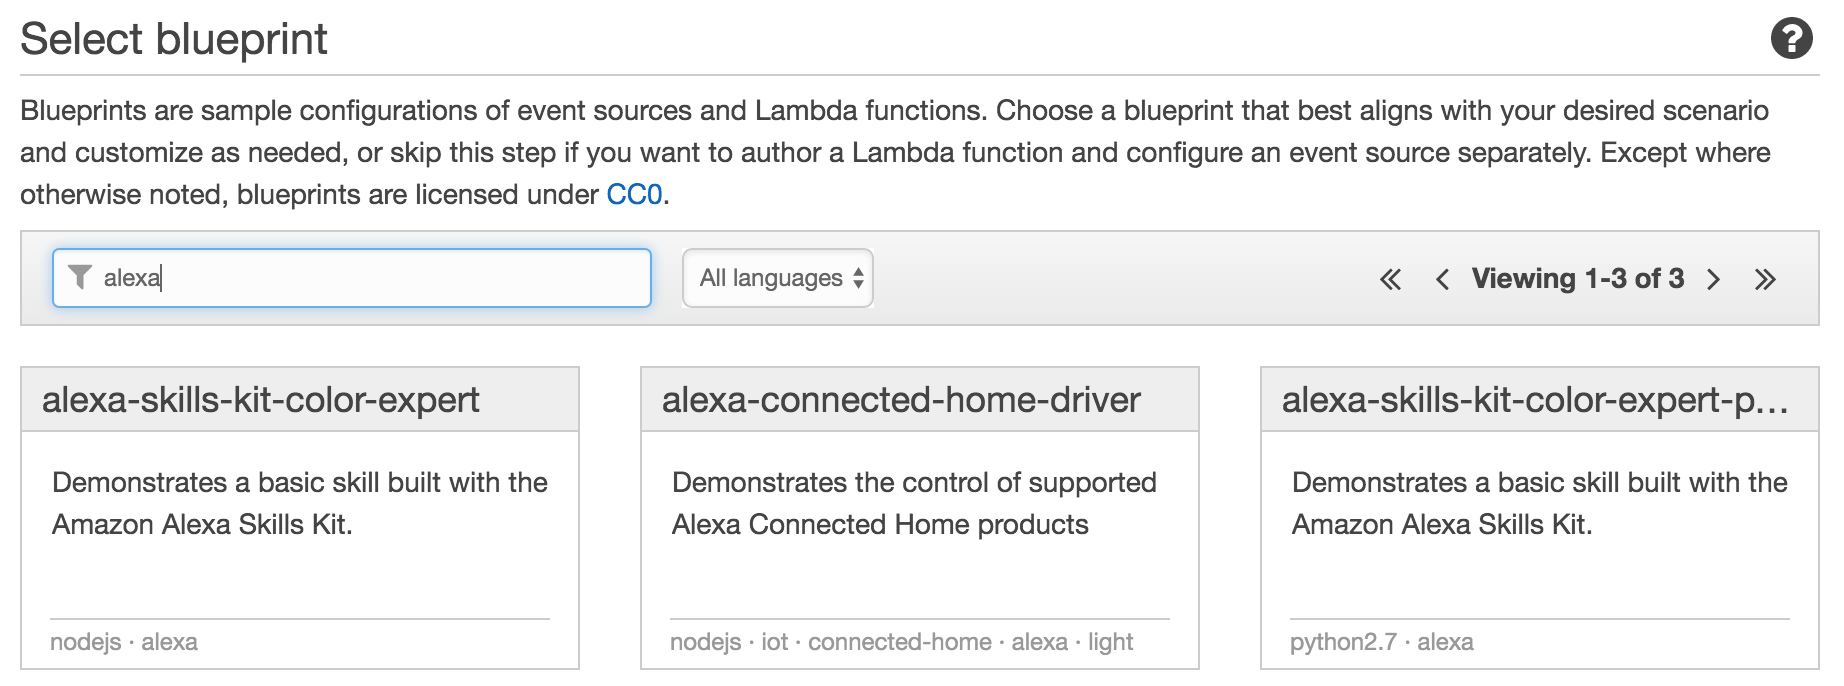
Your functions can be written in Node.js, Java, or Python. I was most familiar with JavaScript, so I went with Node. However, there are Alexa Skill blueprints for Python as well.
I won't go into all the details on how to write an Alexa handling Lambda function in this blog post. There are plenty of tutorials out there on how to do that. The blueprints provided by Amazon are a good start. If you'd like to get the Alexa-to-EV3 application working, you can simply use the lambda function in github, here. Copy and paste the index.js file, and edit the value in the "snsArn" variable (more on this in a little bit).
The Lambda may look a little confusing at first, but the operation is pretty simple. Most of it boils down to the "onIntent" event and the "onLaunch" event. The onLaunch event simply returns back a simple welcome message. This is what you hear when you first start interacting with the EV3 skill. It provides a simple introduction, giving you some sample commands you can utter. It also starts your session with the Alexa. The onIntent event occurs whenever you actually give it a command, like "forward." This command, and the associated slot information get added to an "actionAttributes" object, which ultimately ends up as a message that is sent along to SNS. The SNS code you see in there simply pushes a message of action/value to SNS. Because all of this runs within the context of an Amazon Lambda expression, we have access to the AWS node libraries. This makes communication with SNS or SQS a breeze.
Note: I wouldn't consider this lambda expression to be the best example of writing Alexa functions. This was quick and dirty, and developed as a proof of concept.
Once we've sent the SNS message, the rest of the Amazon side is handled without code.
Creating the SNS Notification Topic
You might be wondering why SNS is part of the architecture. The short answer is - it doesn't necessarily need to be. I added this step because it gave me some debugging and management features that I wanted.
Generally, the point of SNS is to push notifications to various consumers. Often this would be mobile devices. I like SNS because it allowed me to attach multiple different endpoints without having to modify my Lambda function. SNS can marshal the message back out to a variety of consumers, including HTTP, SMS, Email, Email-JSON, Lambda, or SQS. While I was building everything, I subscribed my email address to the SNS topic, along with SQS. This allowed me to receive the raw information out of the Lambda expression via email, so I could diagnose any issues with the SQS queue.
If you'd like to skip this step, simply edit the Lambda function to create an SQS message rather than an SNS message.
Building the SQS Message Queue
SQS is Amazon's MQ system. It allows for a queue of messages to be managed and accessed. This works particularly well for the Alexa-to-EV3 application, as it allows for a semi-persistent sequence of messages/commands to be held until the EV3 is ready to process them. I've configured my queue to retain messages for just 1 minute. This way, as I speak to the Alexa, my commands will become available to the EV3. If my EV3 or console application lose connectivity temporarily, my messages will be ready for me as soon as I re-connect. However, I also don't have to worry about stray messages from an old session sitting around in the queue for days, and the EV3 grabbing those when it starts up. SQS will purge the old ones automatically. This system lets me maintain a message pipe from the Alexa to the EV3, and still be resilient to network failures.
To build an SQS queue, just log in to AWS and go to the SQS section. Click "Create New Queue," and set up some basic information. Probably all you care about is the queue name and the message retention period.
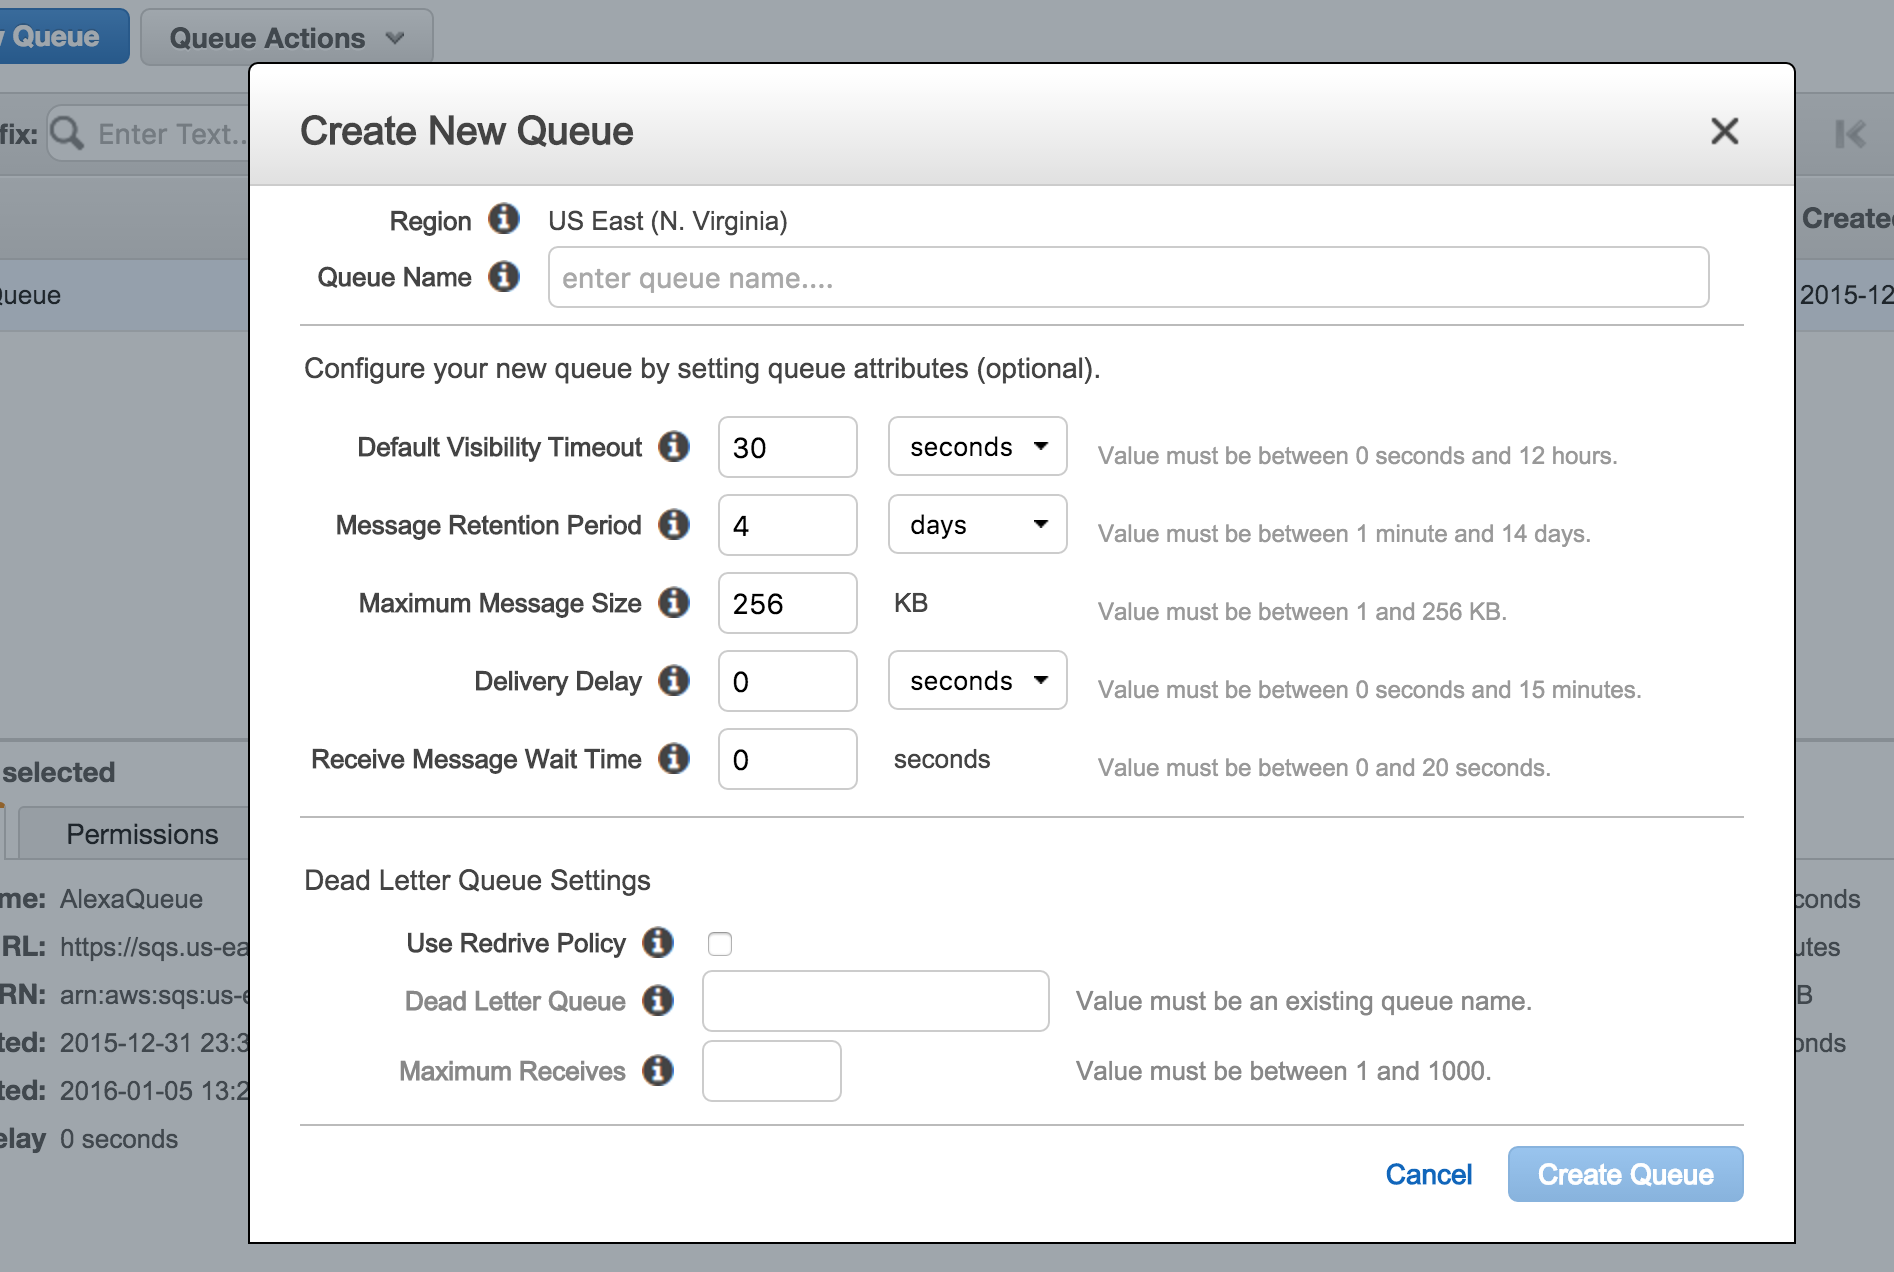
Once it's created, just copy the ARN displayed and use it to subscribe to your SNS topic in the SNS management interface.
That's it! Once you complete those steps, your Lambda function will be pushing messages to SNS, which will in turn add a message to your SQS queue.
At this point, you should be able to start talking to your Alexa and see your messages arriving in your SQS queue.
In my next post, I'll cover the processing/communication side of the solution. This will cover the .NET console application and the Bluetooth communication to the rover.